

Your skin drinks in whatever comes out of that faucet. If you're battling stubborn breakouts, flaky patches, or a baby's angry rash despite a spotless routine, chlorine and heavy metals in your water might be the real culprit. You've upgraded your serums and swapped your cleansers, but the water itself may be undoing all that progress. The right under sink water filter system can strip out the chemicals irritating your skin while leaving the good minerals intact, and installing one is far simpler than you think. Here's exactly how to choose one that fits your skin goals and get it running in under an hour.
Before You Start: What to Know About Your Water and Sink Setup
Tools and Measurements You'll Need
Before you buy anything, figure out what's actually in your water. Chlorine, chloramine, PFAS, and heavy metals each cause different problems. They need different filtration approaches. If your skin gets tight and flaky right after washing, chlorine is often the culprit. If your city switched disinfectants (many did, to chloramine), standard carbon filters may not cut it. A cheap test strip or a call to your water utility's annual quality report will tell you more than guessing ever will.
Next, grab a tape measure. Open the cabinet under your sink and measure height, width, and depth. Cramped cabinets with garbage disposals or deep basins leave less room than you'd think. Note your pipe and valve type too: compression fittings and threaded connections require different adapters, and mismatching them is the fastest way to end up with a slow drip you can't trace. Many local hardware stores sell basic multimeters and pipe gauges cheap, and it's worth the ten minutes.
Also decide early whether you want a dedicated third faucet drilled into your counter, or a hose adapter that taps into your existing fixture. The dedicated route looks cleaner but needs drilling. The adapter route is faster and reversible, which renters tend to prefer.
Matching Filtration Goals to Skin and Hair Concerns
Not every filter is built for the same job, so get clear on your goal first. Are you after drinking water purity, or are you filtering water that touches your skin during washing and rinsing? These overlap less than people assume. A system optimized for taste and clarity in drinking water won't necessarily strip the chloramine or trace metals that dry out sensitive skin or irritate eczema-prone patches. If skin comfort is the priority, look specifically for filters tested against dermatological, not just potability, standards.
For deeper background, learning how to protect your hair skin from chlorine damage helps you understand why some filters that pass drinking-water tests still leave residue that affects skin barrier function. It's a distinction most buyers miss until they're disappointed with results.
If you're still comparing options broadly, browsing a well-known Best Under sink and countertop filter list gives a decent sense of price ranges and stage counts before you commit. Just remember: popularity rankings measure sales, not skin outcomes.
Step 1: Understand How an Under Sink Water Filter System Works
The Role of Each Filtration Stage
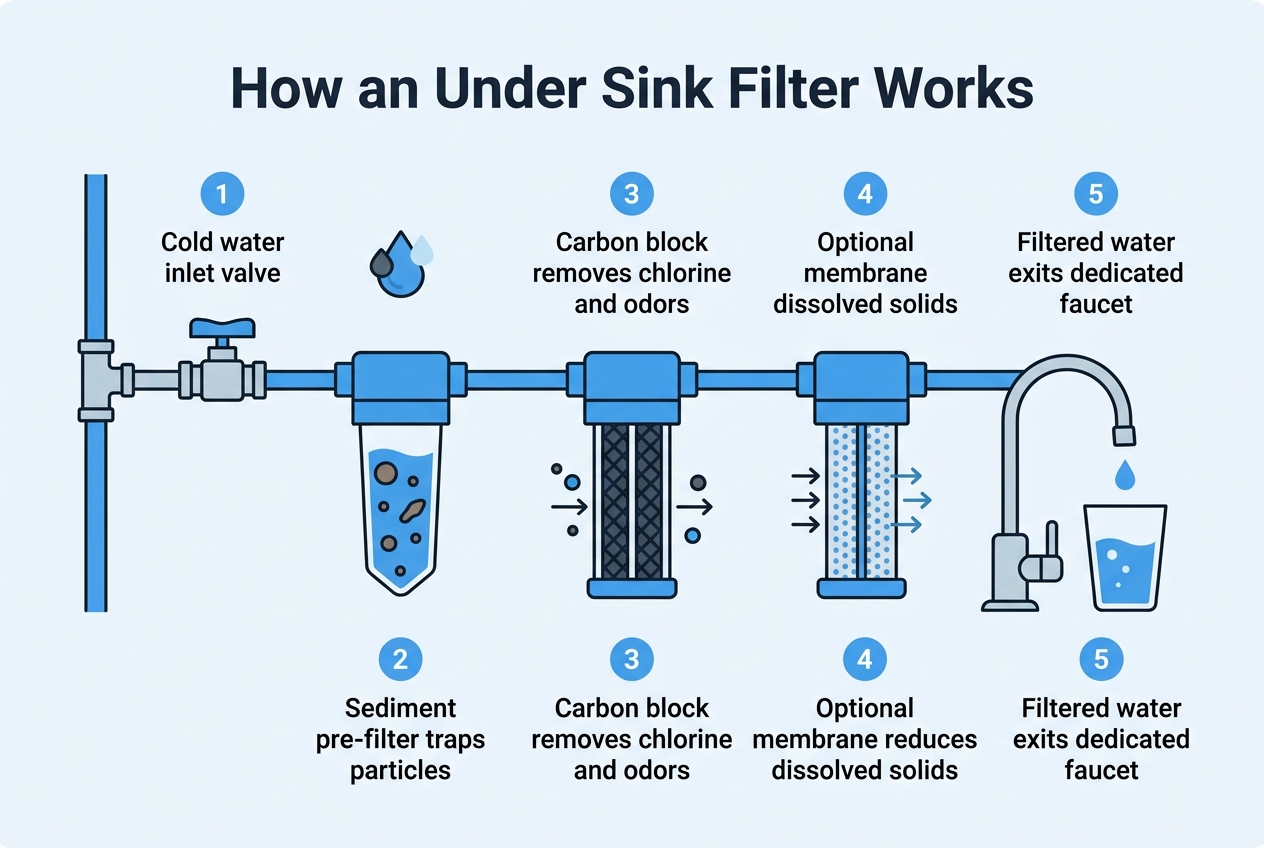
Most systems work in stages, and each one has a job. The first stage is usually a sediment filter, catching rust, sand, and grit before it can clog anything downstream. Next comes a carbon block, the workhorse that pulls out chlorine, VOCs, and a lot of the stuff that makes tap water smell off. After that, you'll often find a specialty media layer, like KDF or a mineral cartridge, tuned to grab specific contaminants the carbon misses. If you want the science behind why this sequence matters, understanding filtration science makes the whole process much less mysterious.
Skip a stage, and you're just asking for trouble. Sediment left unfiltered will chew through a carbon block fast, shortening its life and letting contaminants slip past once it's saturated. That's why layering matters more than any single filter's marketing claim.
Purifying core filters are built for broad-spectrum reduction: chlorine, heavy metals, PFAS, and general water clarity. Antibacterial micro filters target something different, namely microbial growth and chloramine, a compound standard carbon struggles to break down. Many households actually run both, since one handles chemical contaminants and the other handles biological ones. Think of it like skincare layering: a cleanser and a treatment serum do different jobs, and neither replaces the other.
Vitamin C infusions work on a narrower, more specific target: chlorine and chloramine, the two compounds most linked to skin dryness and irritation. Vitamin C neutralizes chlorine through a simple chemical reaction, converting it into a harmless byproduct rather than just trapping it in carbon. Mineral infusions add a secondary benefit, softening water slightly and leaving skin feeling less stripped after contact. It's a targeted fix, not a full contaminant overhaul, so it pairs well with broader filtration rather than replacing it.
NSF/ANSI 53 certification confirms a filter actually reduces specific health-related contaminants like lead or VOCs, tested against a real standard, not just a lab's own claims. NSF/ANSI 401 goes further, covering emerging contaminants including certain pharmaceuticals and PFAS compounds. Without these, you're trusting marketing copy. Retailers like Under-Sink Water Filtration Systems list certification details for a reason: it's the one number that separates a genuinely tested product from a filter that just sounds good on a label.

Step 2: Compare Filter Types Before You Buy
Not every filter does the same job, and picking the wrong one wastes money. Some are built to strip out sediment and rust, others target bacteria, and a few are formulated with skin benefits baked right in. Here's a quick side-by-side so you know what you're actually paying for.
| Filter Type | Main Contaminants Targeted | Best For | Typical Lifespan |
|---|---|---|---|
| Purifying Core Filter | Chlorine, rust, sediment | General household use, older plumbing | 2–3 months |
| Antibacterial Micro Filter | Chloramine, bacteria, microplastics | Baby-safe filtration, eczema-prone skin | 4–6 weeks per cartridge (3-pack) |
| Vitamin C Sink Filter | Chlorine, PFAS, trace heavy metals | Anti-aging routines, daily face-washing water | 2–3 months |
| Replacement Cartridge Packs | Varies by cartridge type | Ongoing maintenance, bulk savings | Depends on pack size (2, 4, or 12) |
If your household includes a newborn or someone with reactive, easily irritated skin, the antibacterial option earns its keep. Chloramine is notoriously stubborn — standard carbon filters often let it slide right through, which is why a dedicated micro-stage matters. For anti-aging skincare fans, the vitamin C sink filter does double duty, since ascorbic acid is known to neutralize chlorine on contact while also softening water's drying effect on skin. Before deciding which cartridge fits your sink setup, it helps to review how sink filtration affects everyday complexion, especially if breakouts or tightness have been an ongoing frustration. Honestly, buying the cheapest cartridge you find and hoping for the best is a gamble — replacement frequency and contaminant targeting matter more than price alone.
Step 3: Verify Testing Standards and Lab Credentials
Dermatologist Testing vs Contaminant Lab Testing
These two types of testing answer completely different questions, and mixing them up is easy. Dermatologist testing on a panel of adults, say 200 or more, measures what happens to real skin over weeks of use: hydration levels, redness, flakiness, breakout frequency. It's subjective in part, but it's grounded in observable results on human skin. Contaminant lab testing is the opposite. It's a water sample run through equipment to measure exact reductions in chlorine, PFAS, heavy metals, or chloramine, usually expressed as a percentage.
A filter can pass one test and say nothing about the other. Strong contaminant removal doesn't guarantee your skin will feel different. A dermatologist-approved "gentle on skin" label doesn't prove much about what's actually being filtered out. You want both numbers before you trust a claim.
Look for testing standards you can name, like NSF/ANSI 53 for health-related contaminants or NSF/ANSI 401 for emerging compounds. If a product only mentions "lab tested" with no standard attached, treat that as a red flag, not a selling point.
Independent Labs, Manufacturing Origin, and Reading the Report
Independent labs matter because a company grading its own homework isn't credible. A named lab, something like a dermacosmetics or skin-science testing facility, adds a layer of accountability the brand can't fake. When comparing options, it helps to also glance at how larger, established players present their data; a well-documented catalog of under sink water filters and filtration systems gives you a useful baseline for what thorough public reporting looks like.
Manufacturing origin matters more than people assume. South Korea has strict cosmetic and skincare manufacturing regulations, and facilities producing skin-adjacent products there tend to follow tighter batch consistency and quality-control protocols. That doesn't guarantee perfection, but it does reduce the odds of filter-to-filter variation that undermines lab results.
Before buying, ask for the certificate of analysis. A real one lists the test date, the lab's name, the specific contaminants measured, and the reduction percentage for each, not just an average "removes 99% of impurities" claim. If a company can't produce that document, that tells you something too.
Step 4: Install the Filter Under Your Sink
Once you've picked your filter, the install itself is mostly patience and a few basic tools. You don't need a plumber for most setups. But you do need to work in order, because skipping a step is how you end up with water on the cabinet floor.
Tools Checklist
Gather these before you start so you're not crawling out from under the sink halfway through:
- An adjustable wrench or basin wrench for reaching tight fittings behind the pipes.
- Plumber's tape (Teflon tape) to seal threaded connections and prevent slow drips.
- A bucket and old towel to catch residual water when you disconnect the supply line.
- A flashlight or headlamp, since most under-sink cabinets are dim and cramped.
- The mount bracket, hose adapter kit, and any washers or O-rings that shipped with your unit.
- A small bowl to hold screws so nothing rolls behind the cabinet and disappears forever.
Installation Order
Follow the sequence below rather than jumping around. Plumbing punishes shortcuts.
- Shut off the cold water supply valve under the sink and open the faucet to relieve pressure before disconnecting anything.
- Attach the mount bracket or hose adapter kit to the cabinet wall or directly onto the supply line, keeping it level so the filter housing doesn't tilt.
- Connect the inlet and outlet hoses, checking that washers and O-rings sit flat and aren't twisted or pinched.
- Hand-tighten fittings, then give them a quarter turn with a wrench. Overtightening cracks plastic housings more often than it stops leaks.
- Turn the water back on slowly and run the faucet for several minutes to flush out loose carbon fines before drinking or using the water.
- Check every connection over the next 24 hours, since a slow drip often shows up hours after installation, not immediately.
If you're comparing hardware, an Under Sink Water Filter from a different provider can show you what a typical inlet-outlet configuration looks like before your own parts arrive. That's a useful sanity check if the included diagram is vague. Don't consider the job done just because water's flowing again. A clean, dry cabinet floor after a full day is the real test.
Step 5: Maintain and Replace Filters on Schedule
Even the best-installed system fails quietly if you forget the filter inside it. Cartridge lifespan varies a lot: some carbon block filters last around 2 months in a busy household, while denser multi-stage cartridges can run 6 months under lighter daily use. Water hardness, household size, and how many people are cooking or filling water bottles all factor in. There's no universal number here, so treat manufacturer estimates as a starting point, not gospel.
Watch for these warning signs
Your senses are actually a decent diagnostic tool. Don't wait for a full breakdown before you check the cartridge.
- Water pressure at the faucet drops noticeably, even though the rest of your plumbing seems fine.
- A chlorine or metallic odor creeps back into water that used to taste and smell clean.
- The cartridge housing shows visible discoloration, sediment buildup, or a cloudy tint you can see through the casing.
- Water runs cloudy or slightly off-color right after you turn on the tap.
- You've simply hit the calendar date the manufacturer recommends, regardless of how the water looks or tastes.
Subscribing to auto-delivery for 2-pack, 4-pack, or 12-pack replacements takes the guesswork out entirely. You stop trying to remember install dates, and you avoid the scramble of running a filter past its useful life. For anyone comparing setups, spending time on under counter water filtration systems is a useful way to see how cartridge intervals and pricing stack up across brands. Bundling shower and sink cartridges onto one replacement schedule also means one delivery, one date to remember, one less thing cluttering your bathroom cabinet.

Step 6: Weigh Costs, Warranties, and Support Before Committing
Money matters here, and not just the sticker price. A dedicated provider's under sink system might cost more upfront than a big-box option, but the real cost shows up over a year or two of replacement cartridges. Run the numbers before you buy, not after.
Subscription Savings vs One-Time Purchases
Subscriptions usually beat one-off purchases if you replace filters on a regular schedule anyway. Skipping a subscription might feel like freedom, but you'll likely pay more per cartridge and forget the swap date. That's a bad combo for water quality.
| Cost Factor | One-Time Purchase | Subscription Plan |
|---|---|---|
| Per-filter price | Full retail, no discount | Typically 10-20% off |
| Shipping | Pay unless order tops $99 | Often included automatically |
| Replacement timing | Easy to forget or delay | Shipped on a fixed schedule |
| Referral savings | Not usually applicable | 15% off stacks for both parties |
| Cancellation | N/A | Flexible, cancel anytime |
Free shipping thresholds and referral discounts quietly change the math too. If a friend refers you and you both save 15%, that's real money back in your pocket over a year of cartridge swaps. Before buying anywhere, it helps to see how various options stack up side by side, and browsing an independent roundup of under sink water filter systems we've tested can sharpen your sense of fair pricing. Also check whether support runs 24 hours; a stuck fitting at 11pm shouldn't mean waiting until Monday. Finally, skim return policies and star ratings closely—consistent 4.8-plus scores across hundreds of reviews usually signal a system that holds up, not just clever marketing.
Final Checklist: Confirming Your Under Sink Water Filter System Is Working
Before you call the job done, run through the basics one more time. Check every fitting for drips, especially after the water's been running a few minutes under pressure. Watch the flow rate at the faucet — a sudden slowdown usually means a kink in the line or a cartridge that's seated wrong, not a defective filter. Finally, taste and smell the water. Chlorine's sharp, swimming-pool edge should be gone. If it's still there, something upstream needs attention. Sites like Best Under sink filter comparisons are a handy gut-check if you're unsure whether your results match what similar systems typically deliver.
Write the install date somewhere you won't lose it — your phone notes app, a sticker on the cabinet door, whatever works. Filter lifespan tracking is the difference between consistent water quality and quietly drinking through a spent cartridge for months.
Sink filtration handles cooking and drinking water, but showers are a bigger exposure point for skin and hair, especially for eczema-prone or sensitive skin. If dryness or scalp irritation lingers, that's your cue to add shower filtration too. Give it two to three weeks, then check in honestly: is skin less tight, is hair less brittle, is redness fading? Small changes add up. No filter fixes everything overnight — patience matters here.
If you're ready to give your skin and water the same level of care, the Helios Sink Filter is a simple place to start—especially knowing it's backed by clinical testing in South Korea and dermatologist testing on over 200 adults. Visit Helios Filter online to explore their sink and shower filter bundles, and feel free to reach out to their 24-hour support team with any questions before you order. Your tap water deserves a second look, and Helios makes it easy to take that next step today.
Share:
Filtration Shower Heads: How They Protect Your Skin and Hair
Do Water Filters Actually Remove Lead? What to Know