

Your skin breaks out, your baby's cheeks turn red, or your eczema flares right after a shower—and chlorinated tap water is often the hidden culprit. Choosing the right water filter for tap use shouldn't feel like a guessing game, especially when you're trying to protect sensitive skin or preserve an expensive skincare routine. It doesn't have to be. Here's exactly how to pick and install one that actually works.
Before You Start: What to Check About Your Tap Water
Signs your tap water is affecting skin and hair
Start by playing detective. Persistent breakouts along the jaw and chest after showering often point to chlorine stripping your skin barrier. Ongoing dryness, redness, or eczema flare-ups can signal chloramine or heavy metals at work. If you're researching this connection, it's worth learning whether does chlorine in tap water cause acne before assuming your skincare products are the problem. Sometimes it's not your routine failing you. It's the water.
Location matters more than most people realize. Municipal water usually carries chlorine or chloramine as disinfectants. Well water tends to bring iron, sulfur, or hard minerals instead. Hard water regions add another layer, leaving mineral film that dulls color-treated hair and leaves skin feeling tight. A quick call to your utility or a home test kit can tell you which category you're in.
Match symptoms to likely culprits: acne and clogged pores lean toward chlorine, chronic eczema flare-ups suggest chloramine sensitivity, and fading color or brittle strands often trace back to hard minerals. Baby skin reacts fastest to all of it, since it's thinner and less protected. Parents should pay close attention to any new rashes after bath time.
Shower vs sink filtration: which to prioritize
Think about where the contact actually happens. Showers expose skin and hair to warm water for several minutes daily. That opens pores and increases chlorine absorption, which makes shower filtration a priority for acne, eczema, and dry scalp concerns. Sink filters matter more for drinking and face-washing routines, especially for anyone rinsing skincare products under running water multiple times a day.
If budget forces a choice, prioritize whichever surface touches your specific problem. Eczema sufferers and new parents bathing infants should lean toward shower filtration first. Anti-aging shoppers focused on facial skincare might start at the sink instead. Many households eventually run both, but you don't have to buy everything on day one.
For a broader sense of what's commercially available beyond specialty options, browsing a Tap Water Filters | Brita & Whirlpool Pitchers & Faucet ... selection shows how mainstream pitcher and faucet filters compare in scope and price. They're fine for drinking water. They're not built for the skin-specific job a shower session needs to do.
Step 1: Understand What a Water Filter for Tap Water Actually Removes
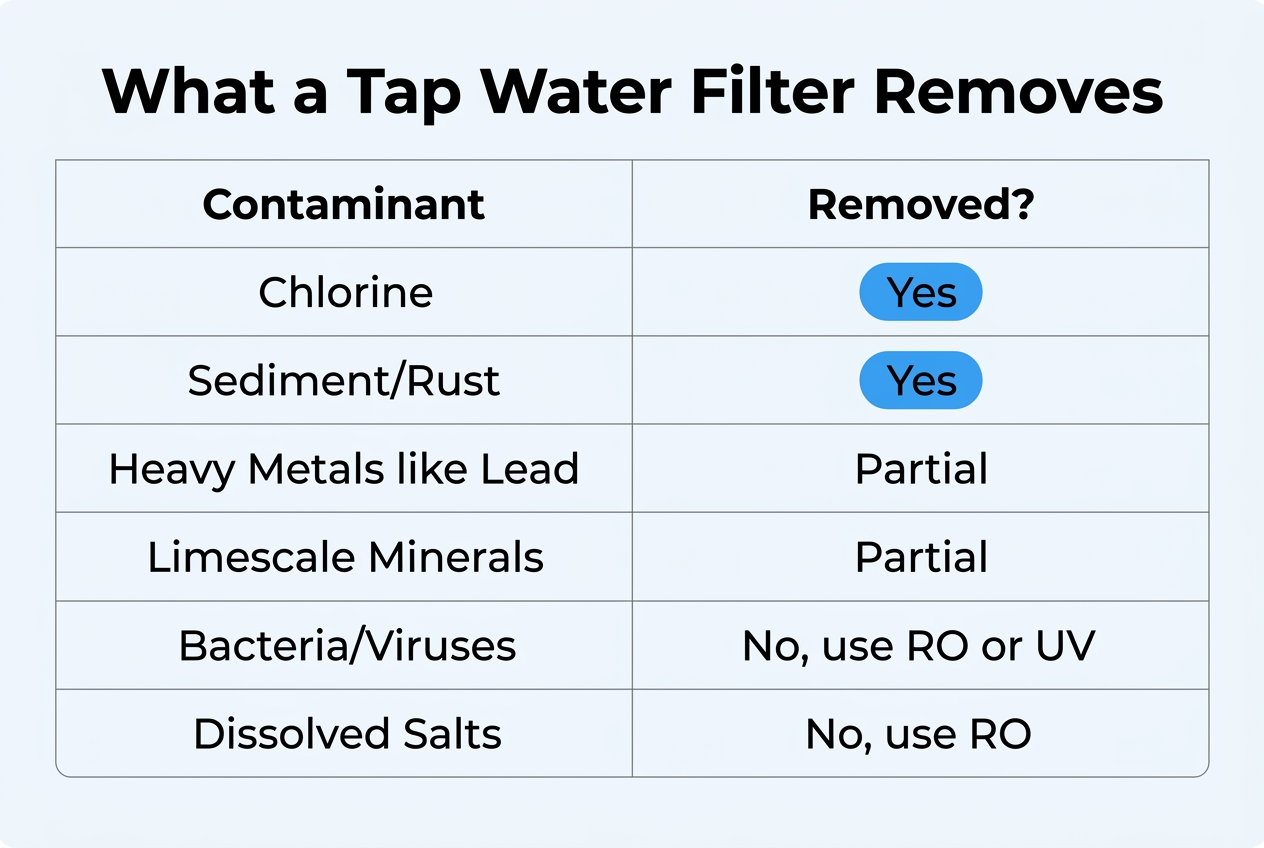
Before you buy anything, it helps to know what's actually in your shower water. Municipal treatment plants add chlorine or chloramine to kill bacteria. That's good for public health, but it's rough on skin barriers and hair cuticles. Depending on your pipes and location, you may also be dealing with rust and sediment, trace heavy metals like lead or copper, microplastics shed from aging infrastructure, and PFAS ("forever chemicals") that have turned up in water systems nationwide. None of this is rare or dramatic. It's just ordinary tap water, and it's why filtration has become less of a luxury and more of a basic skincare step.
Not all filters handle this list equally. A basic sediment filter, the kind found in cheap inline attachments, mostly catches visible particles like rust and grit. It won't touch chloramine or PFAS. Multi-stage filters that include vitamin C or antibacterial media go further, chemically neutralizing chlorine compounds and reducing microbial growth inside the filter itself. If you're trying to gauge whether a claim is credible, learning how experts evaluate filter performance is a good starting point before comparing specs on your own. That's also where certification standards like NSF/ANSI 53 (health-related contaminant reduction) and NSF/ANSI 401 (emerging contaminants, including some PFAS) become useful shorthand.
Set realistic expectations here. No filter, however well engineered, removes 100% of everything. What separates a reputable option from a gimmick is documented, third-party-verified reduction, often in the 75-plus contaminant range, not vague marketing language. Filters also degrade with use, so knowing how long tap water filters typically last matters just as much as which one you choose. A filter losing effectiveness quietly is worse than no filter at all, because you'll assume it's still working.

Step 2: Compare Filter Types Before You Buy
Not all filters do the same job, and picking the wrong one wastes money. Before you buy anything, it helps to know what separates a basic carbon cartridge from a multi-stage system built for skin.
Shower filter options at a glance
Standard carbon showerhead filters mostly target chlorine taste and smell. Vitamin C infusion showerheads go further, using ascorbic acid to neutralize chlorine and chloramine while adding antioxidants that some users find calming on sensitive or reactive skin. Antibacterial micro filters are built specifically for chloramine and bacterial buildup that standard carbon struggles to catch, which matters if your municipal supply uses chloramine instead of chlorine. Specialty options like glow-boost, collagen, or barrier-repair filters layer in minerals or botanical extracts on top of basic filtration, aiming at cosmetic goals rather than just contaminant removal.
| Filter Type | Primary Target | Stages | Best For |
|---|---|---|---|
| Standard carbon showerhead | Chlorine, odor | 1 | Basic taste/smell fixes |
| Vitamin C infusion showerhead | Chlorine, chloramine, oxidation | 3 | Dry or reactive skin |
| Antibacterial micro filter | Chloramine, bacteria | 1-2 | Chloramine-treated water supplies |
| Collagen/anti-aging filter | Contaminants plus added actives | 3 | Anti-aging, hair health |
Sink filter options at a glance
Sink filters serve a different purpose: they treat water you splash directly on your face or use to rinse after cleansing. This matters more than people assume, since research into washing face with just water shows even plain rinsing can leave mineral residue on skin if the source water is hard or heavily chlorinated. A single-stage sink cartridge handles basic chlorine reduction, while multi-stage sink filters with vitamin C infusion tackle chlorine, chloramine, and trace metals together. If you're comparing options, think of single-stage as the budget entry point and multi-stage as the upgrade for anyone managing eczema, acne, or fragile skin barriers.
Step 3: Match a Filter to Your Skin or Hair Concern
Not every filter solves the same problem. Once you know what's in your water, the next move is matching it to your actual skin or hair goal. Someone battling breakouts needs something different than someone fighting frizz in color-treated hair. Think of this as picking a tool for a specific job, not just grabbing whatever's cheapest on the shelf.
- If you have acne-prone or oily skin, look for a filter built to reduce chlorine specifically, since chlorine strips natural oils and can trigger your skin to overcompensate with more sebum.
- If you deal with eczema or general sensitivity, prioritize options that are dermatologist-tested and include antibacterial filtration, since bacteria and residual buildup can worsen flare-ups even after a shower.
- If anti-aging is your focus, look for collagen-support or renewal-style filters marketed around skin elasticity and barrier repair, not just basic sediment removal.
- If your hair is color-treated, choose a filter designed to cut mineral buildup, since hard water minerals are a major cause of fading and dull, brassy tones.
- If you're filtering water for a baby, chloramine reduction should top your checklist. Chloramine lingers longer than chlorine and is harder on delicate, developing skin.
Sink filters matter here too, especially for hand-washing and bathing infants. Many parents compare shower options against under sink water filtration systems to cover both bases at once. There's no single "best" filter overall. There's only the best one for your skin's specific complaints, and being honest about those complaints is step one.
Step 4: Check Certifications and Testing Before Purchasing
Marketing copy is cheap. Anyone can slap "dermatologist approved" on a box. What matters is whether a filter was actually tested on real people, not just modeled in a lab spreadsheet. Look for studies involving a meaningful sample size, ideally 100 or more adults, tracked over weeks of regular use. If a brand won't say how many people were tested or what changed on their skin, that's a red flag worth noting. Real clinical testing should come with numbers: percentage improvement in hydration, reduced redness, that sort of thing, not vague phrases like "visibly softer."
Next, ask who ran the testing. An independent skin science lab carries more weight than an in-house team with an obvious incentive to produce flattering results. Also check for referenced standards like NSF/ANSI 53, which covers health-related contaminant reduction, or NSF/ANSI 401, which addresses emerging contaminants such as pharmaceuticals and pesticides. Not every filter needs both, but a company should tell you which standard applies and why. If you're also filtering water at the sink, understanding how a faucet water filter system is certified gives you a useful comparison point for shower filter claims.
Finally, look at contaminant counts and where the thing was actually made. A filter claiming to reduce 75-plus contaminants, including PFAS, chlorine, and microplastics, should list them somewhere, not just tease the number. Manufacturing transparency matters too. Know the country, know the factory standards. Vague sourcing usually means vague accountability.
Step 5: Install Your Filter Correctly
Buying the right filter is only half the job. A sloppy install causes leaks, weak flow, or a cartridge that never actually touches the water passing through it. Before you start anything, gather a few basics: an adjustable wrench, plumber's tape, and a mount or hose adapter kit if your shower arm or faucet has an unusual thread size. Most fittings in North American homes are standard, but older buildings and imported fixtures sometimes aren't. It takes five minutes to check. Skip that check and you'll be making a return trip to the hardware store.
Installing a filtered showerhead in under 10 minutes
The sequence is simple: remove the old showerhead, wrap the exposed threads with plumber's tape, attach the filter housing, then screw on the new showerhead and run water for a minute to check for drips. Hand-tight plus a quarter turn with the wrench is usually enough — cranking it further just cracks housings or strips threads. Anyone comparing tools online for this kind of plumbing task will notice a basic Tap Water Filter setup often ships with its own tape and adapter, which saves a hardware run.
| Step | Action | Time | Watch for |
|---|---|---|---|
| 1 | Remove old showerhead (counterclockwise) | 1 min | Old tape residue on threads |
| 2 | Wrap threads with plumber's tape | 1 min | 3-4 wraps, clockwise direction |
| 3 | Attach filter housing | 2 min | Hand-tight, don't overtighten |
| 4 | Connect showerhead to housing | 2 min | Correct thread size/adapter fit |
| 5 | Run water, check for leaks | 2-3 min | Drips at each joint |
Installing a sink filter safely
Shut off the water supply first — always. Then attach the unit either directly to the faucet spout or, for under-sink models, into the cold water line using the included adapter. Flush the system for 60 to 90 seconds before first use; this clears loose carbon dust that would otherwise end up on your hands or face. The three mistakes that trip people up most: over-tightening fittings, skipping that initial flush, and assuming an adapter fits without measuring your faucet threads first. None of that is glamorous work, but rushing it is exactly why filters leak.

Step 6: Maintain Filters and Know When to Replace Them
A filter that's overdue for a swap does nothing for your skin. Cartridges lose their capacity over time, and once they're saturated, contaminants just pass right through. Replacement timing depends heavily on usage: a single person showering once a day might stretch a filter to three or four months, while a family of four cycling through multiple showers daily could need a fresh one monthly. Sink filters used for washing your face twice a day tend to fall somewhere in between.
Watch for These Warning Signs
Don't just guess and hope. There are physical cues that tell you a filter has run its course. Ignoring them means you're basically showering in unfiltered water while thinking you're protected.
- Water pressure drops noticeably, which usually means sediment and debris have clogged the filter media beyond what it can handle.
- A chlorine smell or musty odor returns mid-shower, signaling the carbon or KDF media is exhausted and no longer neutralizing contaminants.
- The cartridge itself looks discolored, rusty, or has visible buildup when you hold it up to light.
- Skin that had calmed down starts feeling tight, itchy, or reactive again for no obvious reason.
- Hair starts feeling coarse or color fades faster than expected, hinting the filter isn't softening the water like it used to.
If you'd rather not track dates on a calendar, a subscription or auto-delivery plan solves the guesswork by shipping replacements on a set schedule, so you're never caught mid-shower with a spent cartridge. For sink filters specifically, seasonal home cooks and skincare buffs alike have found it useful to compare faucet filter performance data before deciding how aggressive a replacement schedule they actually need. As for bulk buying, a 2-pack suits a single-person household, a 4-pack fits couples or roommates splitting shower and sink use, and a 12-pack makes sense for larger families or anyone who hates reordering.
Wrap-Up: Building a Long-Term Filtered Water Routine
Let's bring it all together. Start by checking your water, then pick a filter type, match it to your actual skin or hair concern, verify the testing behind it, install it properly, and keep up with maintenance. Skip a step and the whole thing gets shakier. That order matters more than people think — a great filter installed wrong, or never swapped out, won't do much for you.
Shower filtration handles the volume, but your sink water touches your face daily during cleansing and shaving. Pairing the two gives you full-coverage protection rather than a partial fix. If you're weighing options for the sink side specifically, it's worth comparing dedicated Faucet Systems against shower-only setups before deciding how much of your routine needs filtering. Many households end up running both once they notice the difference on their hands versus their scalp.
Give it time before judging results. Track your skin and hair over four to six weeks — that's roughly how long it takes to notice less tightness, calmer redness, or softer strands. Snap a photo now; you'll want the comparison later. And don't wait until water pressure drops or smells return to reorder replacement filters. Performance fades before symptoms of a spent filter become obvious, so set a reminder tied to your specific filter's rated lifespan. A routine only works if you actually keep it running.
If your skin and hair have been feeling the effects of untreated tap water, it might be time to make the switch. Helios Filter's showerhead and sink filters are clinically tested in South Korea and dermatologist-tested on over 200 adults, giving you real, science-backed protection against chlorine, PFAS, and other everyday contaminants. Visit Helios Filter today to explore their range and find the right filter for your routine.
Share:
Do Water Filters Actually Remove Lead? What to Know
10 Best Sink Water Filter Systems for Cleaner Skin in 2026